How to Make a Blur Filter Effect Slideshow
In this tutorial, you will learn how to make a slideshow with Flash blur effect. No ActionScript is adopted in this sample, you only need to apply the newly added feature of SWF Quicker V4.0 – Flash filter to realize this fantastic effect easily ... Let's start!
Series: SWF Quicker V4.0
Estimated Time: 30 Minutes
Preparation: Download the images (1.jpg, 2.jpg) used in this tutorial.
Step 1 Add Flash Blur Filter Effect for the First Image
1. Launch Sothink SWF Quicker V4.0.
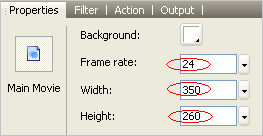
2. Choose File -> New -> New Movie to create a new blank document. And then go to the Properties panel, and set the movie properties as follows:
3. Choose File -> Import to Library, and browse to import the images I provided for this sample. Now in the Library panel, you'll see this:
4. Drag the “1.jpg” image from the library to the stage.
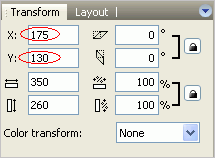
5. While the image is still selected, go to the Transform panel, and set its X, Y values to 175, 130, as follows:
6. On the stage, right-click the image and select Convert to Symbol from the pop-up menu. And then choose “Movie Clip” in the newly opened dialog to convert this image to a movie clip symbol.
7. Click on frame 10 of layer1, and press F6 to insert a keyframe. After that click on frame 20 and press F6 again.
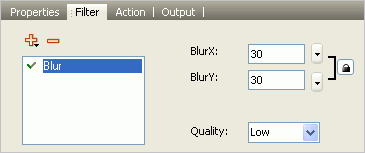
8. While you're still on frame 20, select the image and open the Filter panel. Now click the Add Filter button and select Blur in the pop-up menu. And then you can set the options for the Blur filter as follows:
9. Go back to frame 10 and open the Properties Panel, and then choose Motion in the Tween drop down list. Now the timeline is displayed as follows:
Step 2 Add Flash Blur Filter Effect for the Second Image
1. Insert a new layer (layer 2) in the timeline.
2. Click on the frame 15 of layer 2 and press F6 to insert a keyframe.
3. Drag 2.jpg from the library to the stage. While the image is still selected, go to the Transform panel, and set its X, Y values to 175, 130.
4. Now convert the image to a movie clip symbol. (Repeat the 6th operation of step 1)
5. After that click on frames 25, 35 and 45 of layer 2 and respectively press F6. Now the timeline is displayed as follows:
6. Go back to the frame 15 of layer 2, select the image and apply Blur filter for it. (Repeat the 8th operation of step 1, and set same properties for the Blur filter.)
7. Select again the frame 15 and open the Properties Panel, and then choose Motion in the Tween drop down list.
8. Click on frame 45, select the image and apply Blur filter for it. (Repeat the 8th operation of step 1, and set same properties for the Blur filter.)
9. Go back to frame 35, open the Properties Panel, and then choose Motion in the Tween drop down list. See the current timeline:
Step 3 Smoothly Transit Back to the First Image
1. Insert a new layer (layer 3) in the timeline.
2. Click on frame 40 of layer 3 and press F6 to insert a keyframe.
3. Drag 1.jpg from the library to the stage. While the image is still selected, go to the Transform panel, and set its X, Y values to 175, 130.
4. Now go back to the frame 40, select the image and convert it to a movie clip symbol. (Repeat the 6th operation of step 1)
5. Click on frame 50 of layer 3 and press F6.
6. Go to the frame 40, select the image and apply Blur filter for it. (Repeat the 8th operation of step 1, and set same properties for the Blur filter.)
7. Select frame 40, open the Properties Panel, and then choose Motion in the Tween drop down list. See the current timeline:
Step 4 Preview Your Movie
1. Press Ctrl + Enter in your keyboard to preview the movie, now you will get the effect shown in the beginning of this tutorial.
Have a try!


