Playback External FLV File
I have presented you with an article talking about the difference between embedded video and Using ActionScript to playback FLV. Now, I will give you an example to deep your understanding and practical skills of the latter one, which we recommend a lot.
Series: SWF Quicker 2.0
Estimated Time of Completion: 30 minutes
Prepared work:download Sothink SWF Quicker
1. Before you begin this learning experience, you should prepare some components first, I suggest copying them from the source file. Click videoctrl.rar (3.88 KB) to download the source file.
Tips: For that the FLV file is large in size -- about 2749KB, we didn’t include it in .rar file for your downloading. In fact, the FLV file in this tutorial can be replaced by any other one.
2. The external video source file formats can be converted to FLV file format by third-party software, such as Sothink Flash Video Encoder, Sorenson Squeeze and so on. Besides, SWF Quicker can also convert video source file to FLV video stream. Click File->New->New Window to open a window. In this tutorial, I click File->Import to Library to import the video file "videocontrol.avi". Click open and then set the parameters in Import Video popup box.
For that our bandwidth is 512K for DSL customers, you can direct select DSL (512Kbps), and set the width and Height as 320×240. Under the same bandwidth, the smaller the frame size is, the higher quality the video is. For details about settings of showed in the following dialog box, you can refer to the article "Video Delivery Options".
Tips: You should select "Save a copy of the Flash Video File" (*.flv) to export video file.
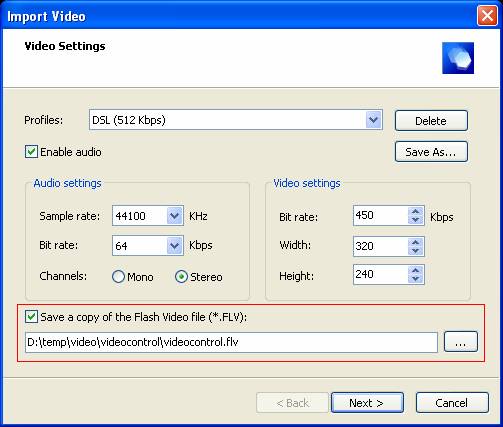
Click Next to convert video file, after that, please close the new window and back to the first window. In this tutorial, I present you with videocontrol.flv, you can direct copy it from source file.
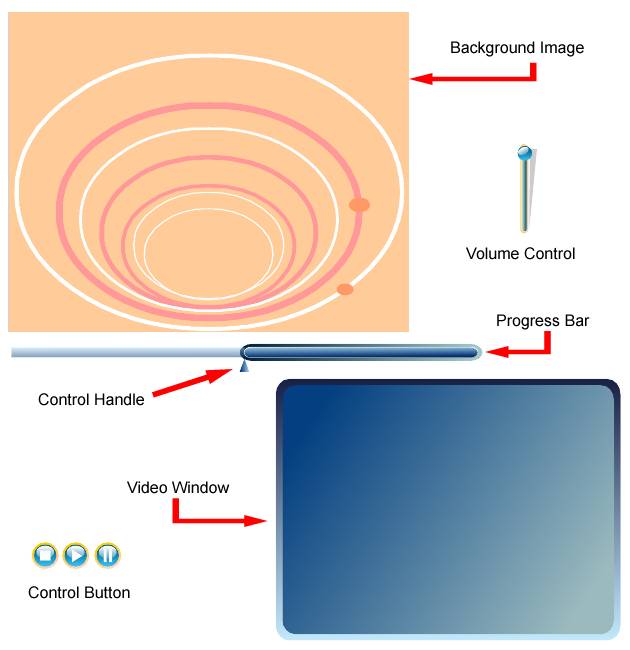
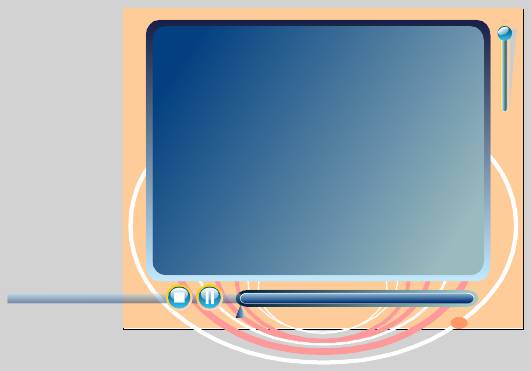
3. Set canvas size as 400×320, frame rate as 25. Position each component on proper place of stage as following illustration. To make better control, it is good to place different components in different layers and you can also give each layer an easy-to-distinct name. One more thing, you need to make the two buttons—Play button and Stop button overlapped. The visual properties of the two buttons can be controlled by ActionScript when movie playback.
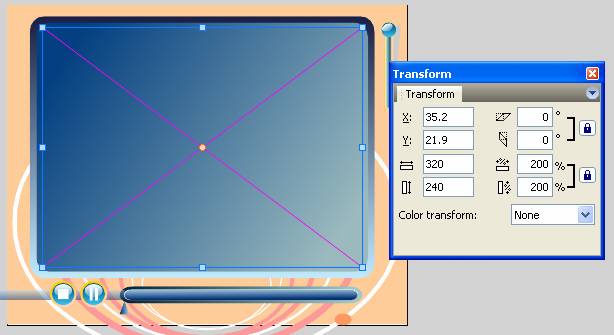
Tips: Remember to give the video window on the stage a size more than 320×240 in Transform panel.
4. Enter "progress" as an instance name for progress bar and double-click the instance on the stage to enter into movie clip-editing mode. As the following illustration shows, layer3 is the mask of layer2. The rectangle in layer2 with an instance named "bar" and the triangle in layer 5 with an instance named "thumb" will move rightwards by using ActionScript along with the rate of progress of playback. The "thumb" can locate the specified position of the progress bar according to rate of progress when you drag it.
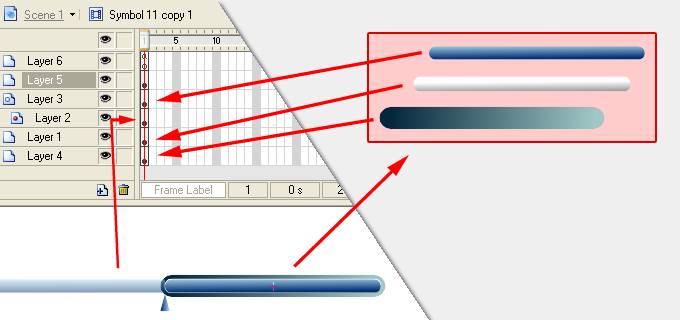
The ActionScript in layer 6 is :
| Code: |
| stop(); |
Add ActionScript for "thumb":
| Code: |
| on(press) { //Start to drag and limit the drag area. this.startDrag(true,-72,11,72,11); this.draging = true; //Pause the video. _root.oldvalue = _root.mediaPlaying; _root.mediaPlaying = false; _root.my_ns.pause(true); } on(release) { //Stop dragging. this.stopDrag(); this.draging = false; //Return to play state _root.mediaPlaying = _root.oldvalue; _root.my_ns.pause(!_root.mediaPlaying); } on(releaseOutside) { //The same to event "release". this.stopDrag(); this.draging = false; _root.mediaPlaying = _root.oldvalue; _root.my_ns.pause(!_root.mediaPlaying); } onClipEvent(mouseMove) { //Compute the current proportion and call the function "scrubbing" to locate specified position for video while dragging. if (this.draging) { _parent.bar._x = this._x -72; _root.scrubbing(Math.floor((this._x+72)/144*100)); } } |
5. Back to main scene. Double-click the volume controller to enter into editing mode; the layer fracture is as follows. The crystal ball with an instance name "VolBtn" in layer 5 is volume control handle, which control the volume according to proportion when you drag crystal ball.
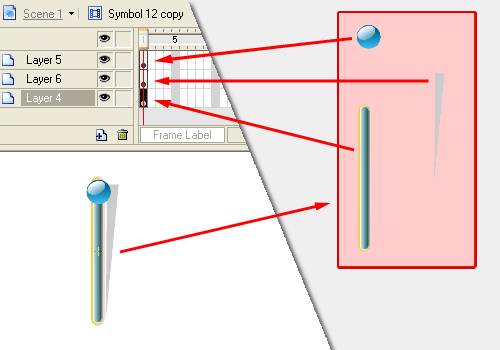
Add ActionScript to "VolBtn":
| Code: |
| on(press) { //Start to drag and limit the drag area. this.startDrag(true,0,-60,0,60); this.draging = true; } on(release) { //Stop dragging this.stopDrag(); this.draging = false; } on(releaseOutside) { //Stop dragging this.stopDrag(); this.draging = false; } onClipEvent(mouseMove) { //Compute current proportion and set the volume when you drag. if (this.draging) { percent = Math.floor((60-this._y)/120*100); sound.setVolume(percent); } } onClipEvent(load) { //Initialize audio object, target movie clip is set as movie clip which includes video, It is "_root" in this sample. var sound = new Sound(_root); } |
6. Back to main scene. Right-click library panel and select "New Symbol", enter "video" as symbol name. Please note the symbol type is "Video", click OK to finish creating new symbol.
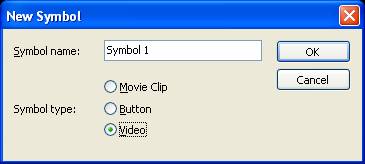
Insert a new layer in timeline and drag it to ahead of other layers. I will put a video window in this layer. Drag the symbol "video" from library to stage, and then you get the a transparent video window, which is an instance of video symbol. Set the transparent video window's size as 320×240 and enter "my_video" as its instance name.
Tips: To select the transparent video window on the stage, you can click the cross line.
7. Insert a new layer as AS layer. Add actionscript in first frame as follows:
| Code: |
| //Create local connection. var my_nc = new NetConnection(); my_nc.connect(null); //Create stream which is used to playback FLV file by the specified object "NetConnection". var my_ns = new NetStream(my_nc); //Attach the video import signal "NetStream" to video object instance "my_video". my_video.attachVideo(my_ns); //Set the buffer time. my_ns.setBufferTime(5); //Playback FLV file. my_ns.play("videocontrol.flv"); //Get FLV file information, "duration" value is the length of time of FLV video stream. my_ns.onMetaData = function(infoObject:Object) { totalTime = infoObject.duration; }; //Get play state, set the relative variables when video stream finishes playback. my_ns.onStatus = function(info) { if (info.code == "NetStream.Play.Stop") { mediaPlaying = false; isEnd = true; setPlayBtn(true); } }; //Set progress bar and time information. function onEnterFrame() { if (mediaPlaying) { setTime(my_ns.time); setBar(); } } //Set progress bar, converse the proportion of current time and total time to the location of progress bar. function setBar(percent:Number) { if (percent==undefined) percent = Math.floor(my_ns.time/totalTime*100); progress.thumb._x = percent/100*144-72; progress.bar._x = progress.thumb._x-72; } //Converse the time properties (unite is second) of video stream to format--"hour: minute: second: millisecond", and then set them to corresponding text block. function setTime(aTime) { var Hours = Math.floor(aTime / 3600); var Residue = aTime % 3600; var Minutes = Math.floor(Residue / 60); Residue = Residue % 60; var Seconds = Math.floor(Residue); Residue = Residue % 1; var Millisecond = Math.round(Residue * 1000); var TimeString = Hours + ":" + (Minutes < 10 ? ("0") : ("")) + Minutes + ":" + (Seconds < 10 ? ("0") : ("")) + Seconds + "."; if (Millisecond < 10) { TimeString = TimeString + ("00" + String(Millisecond)); } else if (Millisecond < 100) { TimeString = TimeString + ("0" + String(Millisecond)); } else { TimeString = TimeString + String(Millisecond); } // end else if time = TimeString; } // End of the function //Locate the specified position for video stream according to proportion when you drag the progress bar. Remember to do some specific change when you drag the control handle to any place of the progress bar. function scrubbing(percent:Number) { if (percent == 100) { isEnd = true; setPlayBtn(true); } else { isEnd = false; setPlayBtn(!oldvalue); } my_ns.seek(percent*totalTime/100); setTime(my_ns.time); } // End of the function //Set the visual state of play button and pause button. function setPlayBtn(bool:Boolean) { playBtn._visible = bool; pauseBtn._visible = !bool; } //Initialize some variables. mediaPlaying = true; isEnd = false; playBtn._visible = false; stop(); |
8. Add ActionScript for Play button.
Add ActionScript for Pause button as follows:
| Code: |
| on(release) { //Stop video playback, locate on initial position. //You should use "my_ns.close();" if the video playback end stream, which can be used in other aspect. mediaPlaying = false; my_ns.seek(0); my_ns.pause(true); //Set Play button state and initial progress state. setPlayBtn(true); setBar(0); } |
Add ActionScript for play button as follows:
| Code: |
| on(release) { //Playback video. If the video ends, it replays. mediaPlaying = true; if (isEnd) { my_ns.seek(0); isEnd = false; } my_ns.pause(false); //Set the Play button state. setPlayBtn(false); } |
Add ActionScript for pause button as follows:
| Code: |
| on(release) { //Pause playback. mediaPlaying = false; my_ns.pause(true); //Set Play button state. setPlayBtn(true); } |
Tips: For that the file name used in my_ns.play() is relative path, the FLV file and SQF ought to be saved in the same directory. The same, the SWF file published and FLV file also should be put in the same directory.
OK, everything is done! Press Ctrl+Enter to preview you presentation now.
Tips: You can put a list of FLV file in SWF Quicker and let users to specify the one they want to playback; or you can put them in the external XML file. SWF can read the XML file in order to get playback list, it is convenient for updating at any moment.
Glad to share learning experience with you!

